Backpacking Maroon Bells Four Pass Loop in 2026 - A Must Do Adventure
This page contains affiliate links. If you make a purchase via a link on this page, we make a small commission at absolutely no extra charge to you. Thank you for your support of this small women-led business.
An Epic Backpacking Trip Through Maroon Bells Four Pass Loop in 2026
This guide covers everything you need to tackle the Maroon Bells Four Pass Loop—from snagging those notoriously tough permits to planning your 26-mile route through four high alpine passes. If you're looking for straightforward info on hiking this iconic Colorado trail without the usual planning stress, you're in the right place.

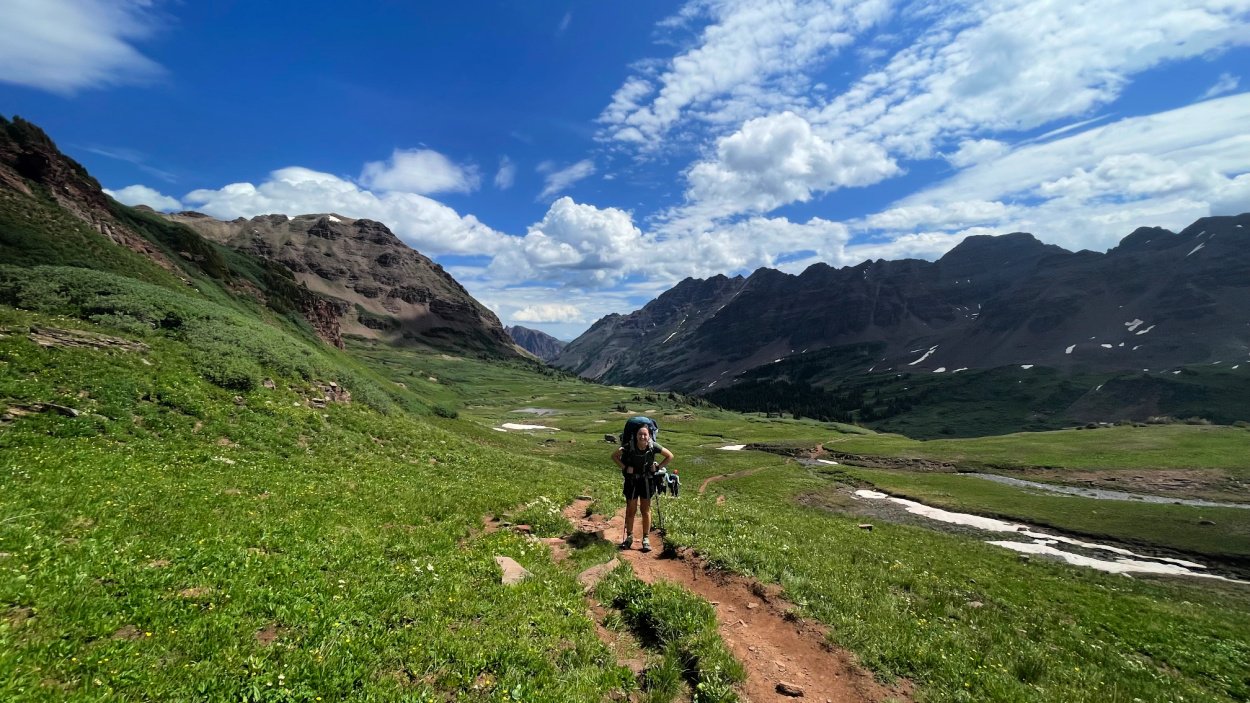
Backpacking Maroon Bells via Four Pass Loop gives you outrageously beautiful mountain views, wildflowers for days, alpine lakes to enjoy and bragging rights for years to come. This three day, two-night 26ish mile loop hike heads up and over four stunning mountain passes with 7,700+ feet of elevation gain.
We also include a four-day, three-night, 30-mile loop starting and ending in Crested Butte. The guide covers camping zones for each night, along with detailed mileage and elevation information for every segment of the hike.
Known for its incredible beauty, brilliant colored wildflowers and the pristine alpine Snowmass Lake, this is truly a must do Colorado hike. Hiking along this trail creates true awe and wonder! While no small feat to plan, organize and prepare for, hands down, this is a favorite Maroon Bells backpacking trail!
What are the Four Passes in the Four Pass Loop?
Four Pass Loop stretches around the majestic Maroon Bells-Snowmass Wilderness, climbing over four 12,000’+ passes (West Maroon - 12,500’, Frigid Air - 12,415’, Trail Rider - 12,420’, Buckskin - 12,500’). This area is home to the Elk Mountains, White River and Gunnison National Forests.
Well known for extraordinary views along with ever changing permit/parking situations, hiking 4 Pass Loop requires a bit of perseverance and a whole lot of preparation. Finding answers to how do I access the Four Pass Loop, how long does it take to hike Four Pass Loop, and many more questions can be an arduous task. At least that’s how I felt when planning our Four Pass Loop hike.
Conquer one of Colorado's most popular hiking adventures - the Maroon Bells Four Pass Loop! Learn how to make the most of your backpacking experience and get tips for the journey here!
PERMIT RESERVATION INSIDER TIP!
This year, permit reservations open February 15. This is for the April 1 - July 31 window. You’ll want all your ducks in a row before that site goes live! In 2023, the park service extended permits to Crested Butte, requiring the permit for every area along Four Pass Loop.
YOU MUST HAVE A PERMIT FOR EACH CAMPSITE!
Which Permits to Get for the Four Pass Loop?
When completing your permit on recreation.gov, be sure to choose camping zones. Campsites are first-come, first-served, except at Crater Lake, which requires selecting a specific site.
Below, we provide three-day and four-day routes, including recommended camping zones for each night.

Let’s Talk!
Got questions about planning this epic backpacking trip?
Book a one hour call. We can help!
Our Four Pass Loop Guide takes away planning ambiguity for tackling these famous Maroon Bells hiking trails. Simply read through the steps, check the links for up-to-date hike regulations and plan your hike on the Maroon Bells Colorado Four Pass Loop. We included a handy dandy At A Glance To Do List and Ultimate Backpacking Checklist at the bottom of this post
Note! A lot of day hikers frequent Maroon Bells Colorado trails. A 4 Pass Loop permit is required for overnight stays in the backcountry. A premade Maroon Bells parking reservation must be obtained prior to parking at Maroon Bells and Crested Butte parking lots.
In our Four Pass Loop Guide, along with the Four Pass Loop map, we share Colorado local insider details on what to pack, eat, and wear.
Check out a secret parking spot for cheap overnight parking, Maroon Bells shuttle information, and how to backpack the two-night, three-day Four Pass Loop.
Backpacking Maroon Bells Four Pass Loop Aspen - Summiting 4 Passes in 3 Days *plus 3 Night/4 Day Trip Plan
The Four Pass Loop Colorado hike is a 4-5 day commitment to accomodate for driving into the mountains, even if you live in state.
For a 3 day, 2 night backpacking hike FROM ASPEN, plan as follows:
Day 1: Begin Four Pass Loop backpacking in Maroon Bells (Summit West Maroon and Frigid Air Passes) | ~ 15 miles
Day 2: Hiking to Trail Rider Pass, (Summit Trail Rider Pass) Camping at SnowMass Lake | ~ 8 miles
Day 3: Snowmass to West Maroon (Summiting Buckskin Pass) completing Four Pass Loop Colorado hike | ~ 6 miles
For a 4 day, 3 night backpacking hike FROM ASPEN, plan as follows:
Day 1: Maroon Lake TH to West Maroon (summit West Maroon) | ~ 6.4 miles
Day 2: West Maroon to North Fork (summit Frigid Air) | ~ 8.7 miles
Day 3: North Fork to Snowmass (summit Trailrider) | ~ 8.3 miles
Day 4: Snowmass to Maroon Lake (summit Buckskin) | ~ 6.1 miles
For a 3 night, 4 day backpacking hike FROM CRESTED BUTTE, plan as follows:
Day 1: East Fork Trailhead to West Maroon trail, summit Frigid Air Pass | ~ 7.5 miles
Day 2: Summit Trailrider Pass to Snowmass | ~ 8.5 miles
Day 3: Summit Buckskin Pass to Crater Lake *requires specific campsite reservations | ~ 9 miles
Day 4: Summit West Maroon Pass to Crested Butte | ~ 6 miles
For those wondering what zones are required per night on this Maroon Bells Colorado hike when booking permits, keep reading!
This Maroon Bells Colorado backpacking trip should be on every hiker’s adventure list. Jaw dropping beauty surrounds you at every turn. However, it requires a lot of planning, organizing in advance plus physical training.
Having hiked the Grand Canyon rim to rim to rim in Arizona, we know how strenuous hikes take a toll on the body. Hiking Four Pass Loop Colorado is a great first time backpacking trip. You need to train and prepare for long days carrying a heavy pack on high altitude summits with early morning starts. Even beginners need a guide to backpacking Colorado!
Always be aware of how you feel hiking at higher altitude, especially if coming from much closer to sea level.
We talk about what to pack near the end of this post.
Four Pass Loop Guide
TABLE OF CONTENTS
Four Pass Loop Trail Map
Four Pass Loop Campsite Map/regulations
Overnight Four Pass Loop Permit *What you MUST know
Best time for backpacking Maroon Bells Four Pass Loop
Four Pass Loop Hike: Two Routes *Aspen to Crested Butte hike or vice versa
Day 1 - Driving to Aspen via Independence Pass
Where to stay around Aspen Colorado
Where to eat in Aspen
Day 2 - Starting Four Pass Loop Colorado Hike via West Maroon Pass from Aspen
Reaching West Maroon Pass and Frigid Air Pass
Day 3 - Summiting Trail Rider Pass and camping at SnowMass Lake
Day 4 - Tackling Buckskin Pass and completing Four Pass Loop Colorado Hike
Four Pass Loop Backpacking highlights *Timelapse video of hike
At a Glance To Do List (with links) for Four Pass Loop Colorado hike
Ultimate Backpacking List - you’ll definitely want this! *Gear, clothes, food
Misc. Information *Search and Rescue, Trail Hazards, Emergency Medical
Four Pass Loop Map

Public property: United States Dept. of Agriculture - Four Pass Loop Map
Four Pass Loop Trail
Distance: 26.2 miles (loop) with start in Maroon Bells (Aspen) *33.2 miles starting in Crested Butte
Elevation: 9,580’- 12,500’
Difficulty: Strenuous
Trailhead Starts: Aspen to Crested Butte hike or Crested Butte to Aspen *clockwise or counterclockwise for both
Region: Central Colorado
Elevation Profile for Four Pass Loop Trail

Four Pass Loop Map elevation profile. Public property White River National Forest United States Department of Agriculture
Four Pass Loop Campsite Map/Four Pass Loop Campsites

Four Pass Loop campsites at Snowmass Lake are marked.
Camping near Maroon Bells in Aspen Colorado is encouraged. However it is not allowed within one hundred (100) feet of any lake, stream or National Forest System Trail. Review the Four Pass Loop Campsite map ahead of time, determining the area you’d like to camp each night.
*RESERVATIONS NEEDED if you plan to camp in a permitted zone (Crater Lake and 4 Pass Loop including Snowmass Lake and Geneva Lake). One reservation per night is required.
*MAKE SURE TO CHECK WHEN PERMITS GO ON SALE! Overnight Four Pass Loop permit reservations are VERY POPULAR. Make a note WHEN the permits go on sale (early February seems to be the trend). These reservations go fast.
How can I secure the right permits for my Four Pass Loop backpacking trip?
YOU MUST PLAN AHEAD for your permit reservations. Once you log onto reservation.gov, you have 15 minutes to get all the permits secured for your trip.
The reservation window opens February 15, 2026 at 8 am MST.
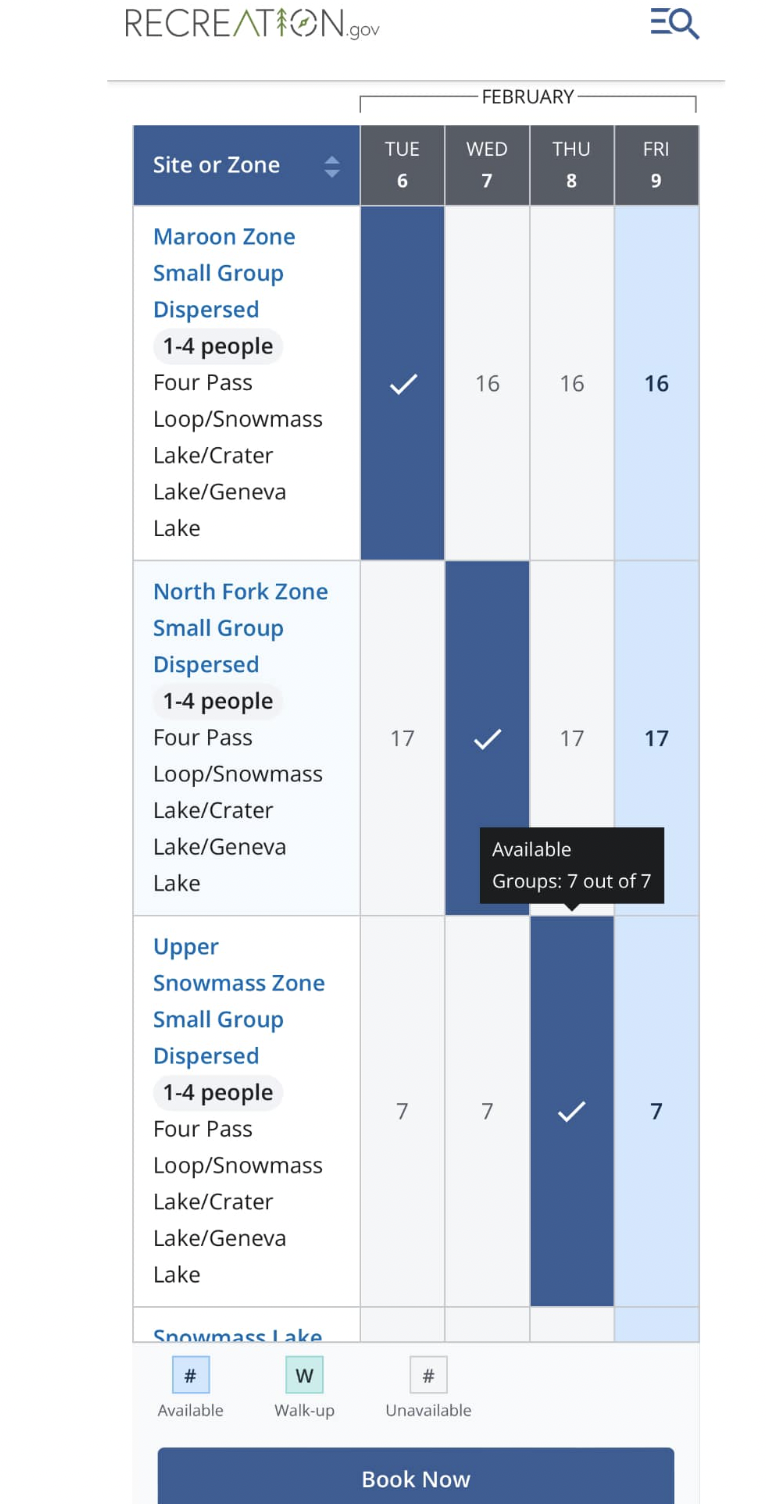
This is for a three night/four day Four Pass Loop hike going clockwise. *This is the route we hiked.
Above is a sample of how to preplan your route to ensure you’ve picked the correct campsites. We highly recommend researching your route and campsites well ahead of time. In 2025, the permits sold out in under 10 minutes.
You can only stay at the campsites you have secured permits for.
Yes, they do check and yes, you will be fined if you do not have a permit!

Our 5lb Featherstone 2 man tent kept us dry despite torrential rain all night.
Originally we planned to hike 4 Pass Loop hike in 4-days, 3-nights. Starting at the Maroon Bells in Aspen Colorado trailhead, we considered camping just above treeline before summiting West Maroon Pass the first day. The above option works great if you arrive after 5 pm the first day of your hike. *You’ll summit West Maroon Pass and Frigid Air on Day Two.
A very early start (6 am) and lots of energy allowed us to climb West Maroon Pass and Frigid Air on Day 1. We found a beautiful inlet near a massive waterfall about 1.5 miles after crossing Frigid Air pass.
Camping near Maroon Bells on Four Pass Loop gave us a view of this gorgeous waterfall and river about 200 yards from our campsite day 1.
Having dealt with torrential rain and hail most of that afternoon, we pitched our tent and hunkered down.
*LEAVE NO TRACE when dispersed camping. Look for flat areas. Glance up to determine no loose or dead branches. (These are called “widow makers.”)
What you pack in, pack out. Upon leaving your Four Pass Loop campsites, make it better than how you found it. (If you moved rocks, wood, etc, put them back where originally found.)
*CAMPFIRES ALLOWED in some but not all areas along Four Pass Loop.
*PRINT FOUR PASS LOOP CAMPSITE MAP prior to your hike, putting it in a ziplock bag along with a compass. This will give you a rough idea where dispersed camping near Maroon Bells Four Pass Loop sites are allowed. Keep the ziplock bag in an outer pocket of your backpack along with maps of the route and permit.
Dispersed Four Pass Loop Campsites. Public property www.fs.usda.gov
*DOWNLOAD CAMPSITES ON PHONE using COTREX. They have most of the campsites marked.
Four Pass Loop Campsites Regulations
Campers must camp in designated sites at Crater Lake. Everywhere else campers should set up more than 100 feet from lakes, streams and trails and use previously impacted campsites.
Campfires are prohibited at all designated sites at Crater Lake and above 10,800 feet including Snowmass Lake. Know the elevation of your campsite and do not have a fire above 10,800 feet.
Overnight Four Pass Loop permit required for overnight stays.
Dogs must be leashed at all times.
Group size is limited based on permit application and approval.
Poop plans are a must! WAG bags are available free of charge at the Conundrum Creek and Snowmass Lake trailheads. Cat holes must be 6 to 8 inches deep at least 200 feet (70 paces) from water, camp and trails.
Pack in, Pack out!
Bear Cans! 2026 UPDATE! You are not allowed to hang anything from trees along most of the trail. Highly recommend Bear cans vs. Ursacks due to this rule. Put in ANYTHING that smells (toothpaste, sunscreen, garbage, etc) *If traveling from out of state, you can rent Bear cans from Ute Mountaineer in Aspen or Alpineer.
No Drones
No Hammocks

NOTE! Overnight permits are NOW REQUIRED AHEAD OF TIME.
Do People Need An Overnight Permit for Four Pass Loop?
reserved overnight permits are required for four pass loop hike!
As of 2023 hiking season, all overnight stays within the Maroon Bells-Snowmass Area require reservations and permits ahead of time.
Prior hikers were able to secure free permits on the trail. Make sure to read all the overnight permit regulations, securing a pass BEFORE beginning the Four Pass Loop trail. *We saw four rangers over our three day hike. Each one checked our pass.
What is the Best Time to Hike Maroon Bells Four Pass Loop?
This two-night, three-day Colorado backpacking hike takes you through the Maroon Bells-Snowmass Wilderness, adorned with colorful wildflowers, tall pines and alpines lakes.

Wildflowers are stunning July and August.
The most popular route weaves along rugged high peaks of the Elk Mountains, spectacular in summer months. Wildflower season peaks in July and early September is ideal for fall leaf peeping.
The best time to hike Maroon Bells via Four Pass Loop is late summer to early fall (July - September), avoiding early summer’s high snow melt and large snow drifts.
Day runners will zip by you, knocking out all four passes in one day. We highly recommend taking more time to soak in the jaw-dropping views and wildflowers.
Water sources are at their highest in late May/early June. Water in general is plentiful except for the south side of North Fork Zone and East Fork Zone. In later summer/early fall, rivers in the East Fork Zone typically have very low flow.
INSIDER TIP! Hiking 4 Pass Loop clockwise, taking West Maroon Pass via Aspen is lovely, holding out its steep incline until the final 1 mile push to summit. Going this way is easier, in our opinion, with first day heavy backpacks. One can argue the best views are between Trail Rider and Buckskin passes, saving the best for last!
NOTE! Overnight permits go on sale early February. If you plan on parking and hiking Four Pass Loop, YOU WILL NEED an overnight permit for each day you hike. Reserve at recreation.gov.
Summit view from West Maroon Pass facing Crested Butte
Four Pass Loop Colorado Hike: Two Routes
Trailhead Start: Crested Butte
Tanya day hiked West Maroon Pass in reverse from Crested Butte to Aspen. Many Four Pass Loop backpackers choose starting in Crested Butte. It adds a few extra miles (between 5-7 depending on route and GPS devices).
NOTE! Starting 2023, overnight permits are required for both Crested Butte and Aspen Four Pass Loop hikers.
*Those wanting to park overnight to backpack in the Maroon Bells Snowmass Wilderness need to make a reservation to park overnight. Reserve at recreation.gov.
DRIVING DIRECTIONS:
Hiking Four Pass Loop trail via Crested Butte, drive Gothic Road north 14 miles over Schofield Pass, following the East River. After passing Emerald Lake on your left, spot the large parking lot. Trailhead is on the right side. See this map.
You’ll need a 4WD vehicle for Gothic Road. There is one spot that is very narrow with exposure. Make sure you are comfortable backing up in this situation.
*Allow 45 minutes (or more) for this 14 mile drive.
TRAIL DIRECTIONS
Follow the trail looking for a small wooden sign directing you towards West Maroon Pass (trail #1970). You’ll hike through a valley until you reach the junction for Frigid Air Pass. The one-way distance to the junction is 3.1 miles.
At this point, you have two options:
Head clockwise towards Frigid Air Pass, camping on the other side. *Less people
Head counterclockwise, summiting West Maroon Pass and camping near Glacier Lake. *More day hikers and Maroon Bell tourists.
Trailhead Start: Maroon Bells In Aspen Colorado
Starting Four Pass Loop Aspen side, make sure you read up on ALL the parking, shuttle, driving information below. A big part of planning backpacking Maroon Bells Four Pass Loop involves parking and permit reservations.
If you're NOT taking the Maroon Bells shuttle and do NOT have a reservation, make sure to be dropped off before 8 a.m. or after 5 p.m. Maroon Creek Road is restricted to vehicles beyond the T-Lazy 7 Ranch unless you have a campground reservation.
*FOR ALL MAROON BELLS ASPEN SHUTTLE, PERMIT, PARKING INFORMATION, SEE BELOW.
Starting at Maroon Bells for the Four Pass Loop hike
DRIVING DIRECTIONS
From Aspen, follow Hwy 82 heading west to the roundabout just outside of town. Exit the roundabout at Maroon Creek Road. Continue another 4 miles to the Maroon Bells Scenic Area Welcome Station. Use fee is collected here, either in person or in the fee tube behind the station. Continue another 5 miles to the parking lot at Maroon Lake.
TRAIL DIRECTIONS
Trail can be taken two ways. Heading clockwise allows for a more gentle ascent up West Maroon, especially great for our heavy first day packs. Clockwise has you tackling Buckskin Pass, a very steep incline on the first day.
Follow the Maroon-Snowmass trail along Maroon Lake’s north (right) shore to the junction at the “Deadly Bell’s Kiosk” near the top of the lake.
Four Pass Loop Parking, Reservations and Maroon Bells Shuttle Information
Reservations are required from Aspen to reach Maroon Bells
Reservations are required to hike to Maroon Bells Colorado when entering the area by shuttle or personal vehicle. Vehicle access begins mid-May and the shuttle system from Aspen Highlands begins early June. You can make reservations at aspenchamber.org.
Reaching the West Maroon Trailhead *Aspen
If you can have a friend or personal shuttle drop you off before 8 am, choose that route!
Personal vehicles are allowed from mid-May until the Maroon Bells Shuttle begins operating in early June, however, reservations are now required due to minimal parking at the lake.
Between early June and late October between the hours of 8am and 5pm, ALL VISITORS are required to take the shuttle to Maroon Bells from Aspen Highlands. (This includes those parking at Aspen Highlands and surrounding lots/etc.)
*ASPEN HIGHLANDS PARKING LOT: Visit the Aspen Resort Chamber Association website for reservations, updated dates on each summer and parking fees.
*MAROON BELLS SHUTTLE: The shuttle from Aspen Highlands Ski Area leaves every 20 minutes. From the Hwy 82 Roundabout, just west of Aspen, take the Maroon Creek Road turn. In approximately one mile is Aspen Highlands, turn left here for the shuttle.
*PRIVATE DROP-OFFS: Private vehicles are allowed to drop off passengers between 6AM and 8 AM without a parking reservation. Any visitor planning to come back down the hill between 8am-5pm will need to reserve a one-way ticket to ride the shuttle down to Aspen Highlands. Commercial drop-offs are not allowed at any time. Learn more and get your tickets here.
*FEE REQUIRED: The Maroon Bells Scenic Area requires a mandatory recreation fee. If arriving during non-bus hours, continue another 4 miles to the Welcome Station. The use fee will be collected here, or in the fee tube behind the station.
*National Parks pass with Golden Eagle sticker, Golden Access, America the Beautiful and Maroon Bells Passes allow access to the Maroon Bells Scenic Area for the season. Passes are not valid when the road is restricted to motorized vehicles from 8am-5pm and parking reservations are still required.
ASPEN AIRPORT: If arriving into the Aspen airport and headed straight to the trail, use High Mountain Taxi located right outside baggage claim. As of the time of publishing, the cost is around $35. (970-925- TAXI) or catch the FREE bus to Highlands from the airport from RFTA bus stop.
Note! If taking the free RFTA bus from airport, head towards Aspen, up 8th street. Get off, walk across the street and take Highlands bus going opposite direction to Highlands.
SECRET PARKING TIPs For this Maroon Bells Aspen Hike!
If the $40/day parking fees at Aspen Highlands Village seem steep, here’s a few alternate options.
Park in Public Rio Grande Parking Garage in Aspen (intersection of North Mills St and East Main St). At the time of publication, it is $30/5 days of covered parking. From the garage, walk a few blocks south to Rubey Park Transit Center (bus stop: South Mill St/East Durance Ave). The FREE Castle Maroon bus route runs every 20 minutes, taking you straight to Aspen Highlands Village. Plan on a 15 min bus ride. Catch your reserved shuttle to Maroon Bells Trailhead here.
Have a friend or family member drop you off at BEFORE 8 am or after 5 pm.
Book a shuttle through Alpine Express or Dolly’s Mountain Shuttle. They pick you up from town and take you to the trailhead. Both companies offer pick up at trailhead for town drop off on return trip, or they can be booked for a ride all the way back to Aspen.
If you are staying in Snowmass, park at Buttermilk lot. You can catch a bus to the Maroon Bells shuttle there.
Taking the RFTA bus back up the hill? You will need to reserve tickets again, the earliest option being 8am. This is a great option if you plan on camping near the first pass day one. Get on the RFTA ASPEN HIGHLANDS bus at Paepcke, then switch over to the Maroon Bells bus. Once at Maroon Bells Scenic Area, you will have access to Maroon Creek Trail.
*Forest Service prohibits parking at the trailhead.
Drinking in some fantastic views on the Independence Pass summit
Driving to Aspen Via Independence Pass
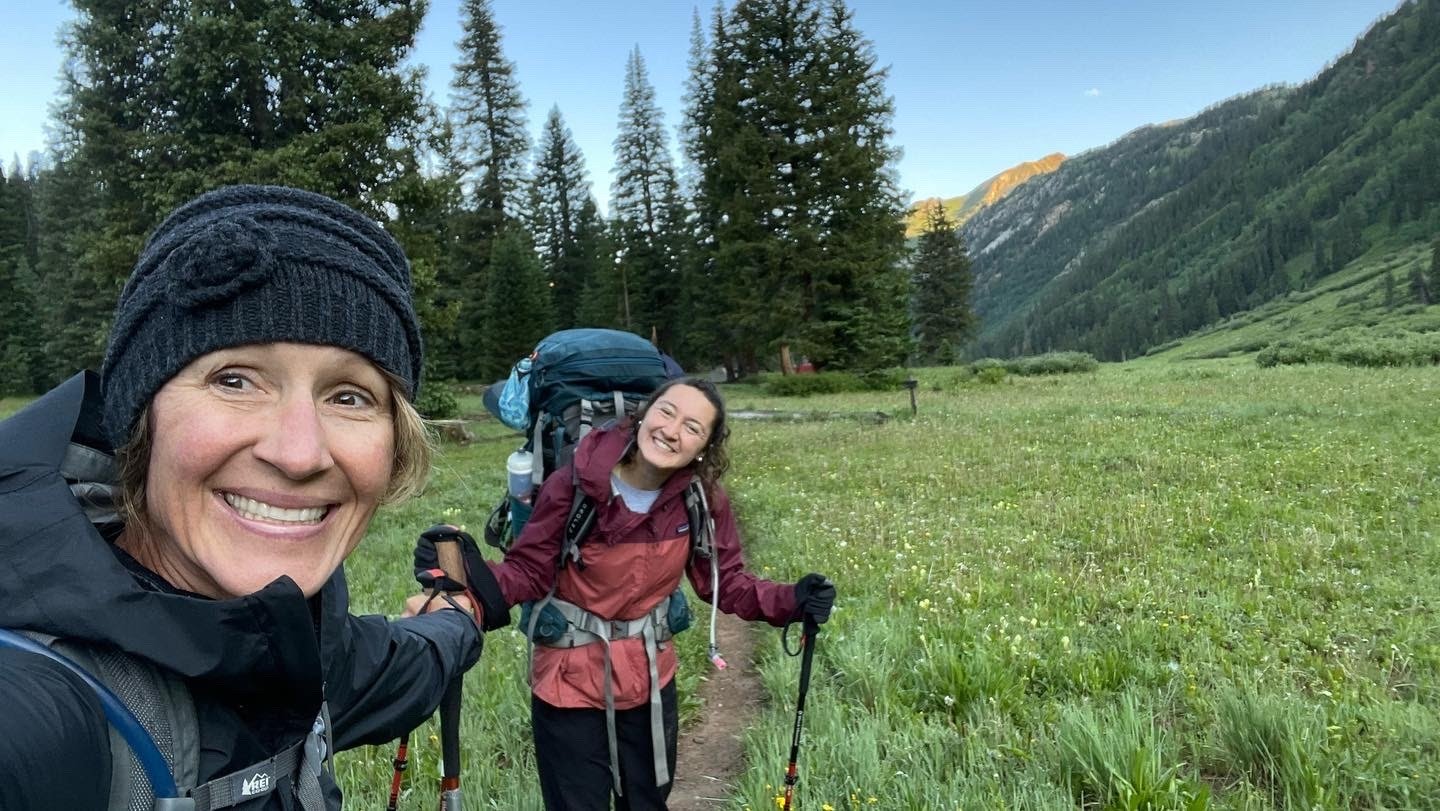
It takes a village to conquer 4 Pass Loop. Well perhaps just a shuttle driver and food/beverage support. My college daughter and I were the hikers with my husband and youngest came along for the ride.
Driving over Independence Pass is a treat that should not be missed! July’s wildflowers were in FULL bloom, hues of purples and blues against the Colorado deep blue sky. At the top of the pass, stop and stretch your legs, snagging a few photos to start this iconic Maroon Bells Aspen hike.
We drove all the way on the interstate to Aspen via I 70. Part of Colorado State Highway 82 passes over the Continental Divide between Leadville and Aspen. Open seasonally, Independence Pass will take you up and over 12,095’. Toilets are available at the Pass summit’s parking lot.
Stunning flowers on Independence Pass
IF YOU HAVE TIME, take a side hike to the Ice Caves on the Grotto’s Trail. Driving over from Leadville / Buena Vista area via Independence Pass to Aspen, this easy hike is a worthy, quick stop.
The Ice Caves are found on The Grottos Trail. All ages love the unusual boulders, the cool ice cave and cascading waterfall. We hiked it counter-clockwise. You need only an hour and it’s a great way to get your blood flowing after driving the pass.
In the Ice Caves
Where to Stay in Aspen
Depending on budget and desire, Aspen and surrounding cities offer many options for lodging before and after the Four Pass Loop hike.
If luxury means a heated pool and relaxing hot tub, Hotel Aspen should be homebase. Clean rooms and to-go breakfast boxes at your request. (110 W Main St. Aspen, CO 81611)
INSIDER TIP! If you are a Colorado resident, ask about the discount at Hotel Aspen.
If your shuttle driver happens to be staying put awaiting your arrival post Four Pass Loop, book a few nights in Aspen. They can hike, paddle board, bike and more while you conquer one of Maroon Bells hiking trails!
Aspen offers condos, rustic cabins, villas and quaint lodging that have to break the bank.
We chose to stay in nearby Basalt, giving my husband and daughter opportunities to explore the greater Aspen area for the three days we hiked Four Pass Loop. This small western town has a niche downtown with great ice cream options, a few breweries and of course, pub food! Snowmass Village offers inexpensive lodging and access to the public bus system.
*We booked a home in Basalt for the week. My husband and daughter explored nearby Maroon Bells Aspen hikes. We loved having a hot shower to come back to after our Four Pass Loop hike.
PREFER TO CAMP? Right along Maroon Creek Road leading up to Colorado’s Maroon Bells Scenic area are three campgrounds: Silver Bar, Silver Bell, and Silver Queen.
If you camp along Maroon Creek Road at the above campgrounds, you are allowed to drive your personal vehicle to the Maroon Bells area ANY TIME OF THE DAY. Yes, no permit needed! WHOOP!
All three campgrounds sit just before the East Maroon Portal/Trailhead and are only a 10-minute drive from the Maroon Bells Wilderness.
Where to Eat in Aspen, Colorado
Here are a few favorite hops and stops in Aspen and Basalt:
Free Range Kitchen has locally sourced made to order meals. After hiking Four Pass Loop, we scooted in here and devoured the menu. 22864 Two Rivers Rd Basalt, CO 81621
Sundae Basalt was the first stop on our way back from Four Pass Loop. Ice cream any time of the day sounds lovely. 499 Market St Basalt, CO 81621
Paradise Bakery & Cafe was the final stop on our way home. We grabbed a few sandwiches to go and threw in some baked goods because our calorie burn during the hike made us HUNGRY! 320 S. Galena St, Aspen, CO
Backpacking Maroon Bells Four Pass Loop Trail Details *Headed Clockwise toward West Maroon Pass
There are two main ways to hike Four Pass Loop from the Aspen Maroon Bells Trailhead.
Head counterclockwise, tackling Buckskin Pass first *We did not go this way. Buckskin is much steeper than the steady incline of West Maroon Pass. With loaded backpacks, we wanted to save our energy. For hike details specific to this route, head to the All Trails MAP LINK
Head Clockwise, summiting West Maroon Pass.
After much reading, research (and having hiked Buckskin Pass previously), we decided to head clockwise toward West Maroon Pass.
Day 1: Hike Maroon Bells via West Maroon & Frigid Air Passes
QUICK LOOK
Length: 7 miles to West Maroon Pass, 2.4 miles to Frigid Air Pass, 3 miles to campsite : 12.4 miles total
Time needed: 9 hours *We took extended breaks at West Maroon and Frigid Air Passes. Our packs were HEAVY!
Elevation: Between Maroon Bells and West Maroon (2,920’)/Between West Maroon and Frigid Air (Elevation gain/loss: +687-ft./-787-ft.)
Route: West Maroon Pass - Frigid Air Pass. Overnight camped after Frigid Air Pass.
The alarm went off at 4 am. After guzzling a few cups of coffee, knowing all the creature comforts of modern life would soon be tucked aside for a few days, we headed down the road to the Maroon Bells West Maroon Trailhead.


On the road at 5 am, we arrived at Maroon Bells parking lot at 5:30 am. Our driver (Melody’s husband, Matt) and youngest daughter wanted to get in a bit of hiking with us. *They had secured a Maroon Bells parking reservation ahead of time and were able to stay until midday, hiking some of these Four Pass Loop trails with us.
Sunrise overlooking the Maroon Bells is worth the early hour. WIth very few others around, we enjoyed taking photos and soaking in the wildflower beauty and brisk morning air.
Before beginning, make sure to snag that quintessential photo at the famous Maroon Bells. The well worn gravel pathway around the famous Bells will lead you to Maroon Snowmass Trail.
One more stop at the pit latrines and off we went, clockwise towards West Maroon Pass. Our goal was to camp on the other side of West Maroon, making this a three night trip. (We summited West Maroon Pass at 10 am, spurring us on to conquer Frigid Air on the first day).
Be prepared to navigate a lot of big and small rocks on Maroon Snowmass Trail. This wide well shaded trail is home to singing birds. Our early July morning was filled with sun and blue skies, the perfect way to start this top Colorado hike.
Hiking Maroon Bells Hiking trails - Maroon Snowmass Trail toward Crater Lake
The first few miles were all about getting used to our backpacks. Weighing in around 30 lbs (those blasted bear cans are HEAVY), we did a fair amount of stopping and adjusting straps.
The trail is rocky with a steady uphill climb. I, Melody, had been training all winter for this trek. Hours spent on the stair climber with a loaded backpack made this section of the hike seem relatively easy.
My daughter, Caroline, a college athlete and physically fit, didn’t have time to hike or train at altitude. We quickly realized that if I took some of the extra weight, we’d be able to stay on pace (around 2 miles/hour).
Matt, my husband and our youngest daughter joined us for the first 3 miles. Expect progress to feel slow along this way. If the rocks don’t slow you down, the mountain views sure will!
Pass 1: West Maroon Pass Trail Highlights
Follow the Maroon-Snowmass trail along Maroon Lake’s north shore. Around 1.7 miles, take a left toward Crater Lake. Keep an eye out for views of Pyramid Peak (14,018’) on this section.
Taking in the stunning views on Maroon Snowmass Trail

This junction is at 1.7 miles from the trailhead. Continue straight ahead (south) on the West Maroon trail toward Crater Lake and West Maroon Pass

Rest stop on Day one - Crater Lake
REST STOP #1: We got to Crater Lake, happy to spend some time adjusting our packs for the millionth time. After eating a mini breakfast of protein bars and trail mix, it was time to start moving, walking along the western shoreline of Crater Lake.
We saw a few backpackers packing up camp from their night in designated camping spots.
The trail graciously gifts you with a steady but meandering uphill through meadows and trees. Coming out from the trees, the steep hike up through a rockslide begins. It’s A LOT of rock.
At 3.6 miles, arrive at the fIrst creek crossing to the east side of West Maroon Creek. Tackling this Four Pass Loop hike in early July meant some serious rushing water.
Saying adieu to our chauffeurs, we donned water shoes, unbuckled our backpacks and headed across the frigid water. Water crossings can be treacherous. Brush up on backpacking tips to safely get yourself and pack across rushing water.
*Depending on what month/week you’re backpacking Maroon Bells Four Pass Loop, you might have a giant rushing river or a small trickling stream.
Immediately the trail winds through thick willows. Wearing long pants really helped keep my legs from scratches. Take frequent but quick stops to soak in nature’s wonder around you. The immense mountain ranges were impressive!
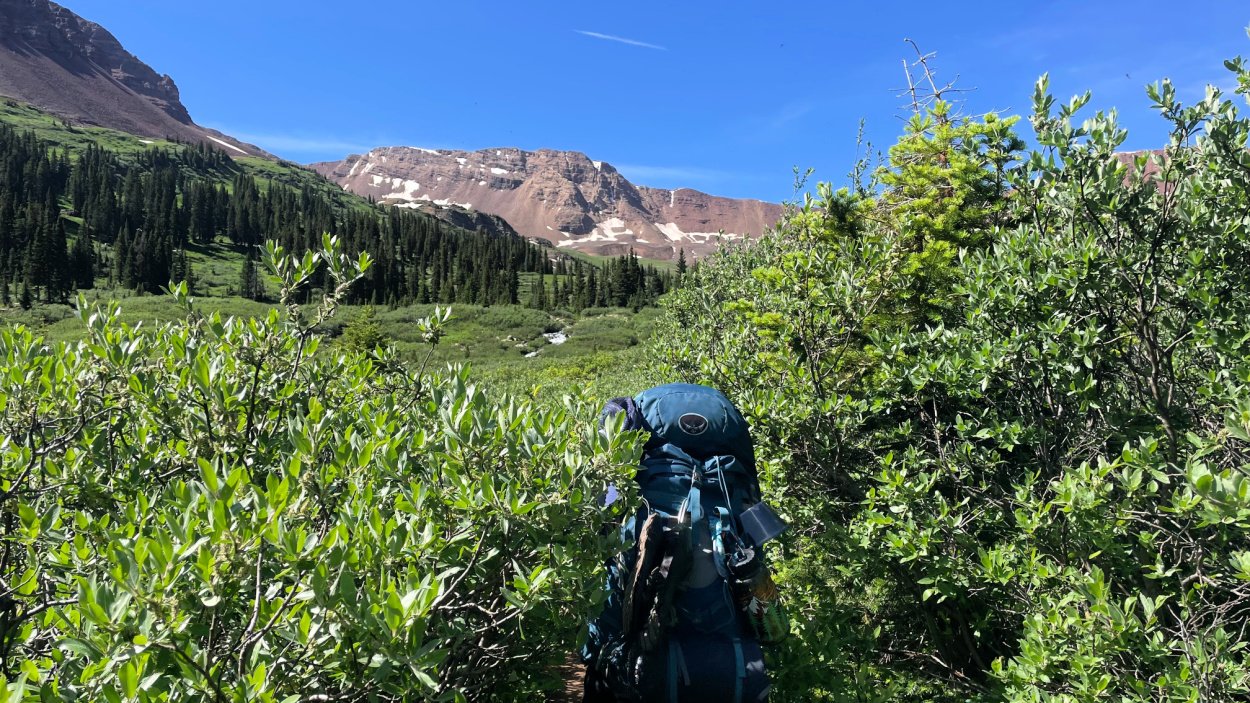
*FOUR DAY/THREE NIGHT CAMPING OPTION: Find designated camping near Maroon Bells Glacier Lake. Consider campsites just past the thick scrub oak groves after river crossing one or look for level (ish) ground just above tree line before summiting West Maroon Pass.
At 4.5 miles, the trail crosses back to the western side of the creek. Slather on sunscreen because your shade goes away as the trail follows a path among more scrub oak dotting large meadows.
You’ll hike through the basin, leaving breathtaking views of Pyramid Peak behind you. As you continue toward West Maroon Pass ridge, take a deep breath and start the West Maroon Pass, gaining 800 feet in 0.7 miles.


We crested West Maroon Pass around 10 am. Once you get to the top, take off the backpack and settle in for a snack with views for days. From West Maroon Pass, take in the Maroon Bells Pyramid Peak (14,018’), Belleview Mountain and Treasure Mountain.


INSIDER TIP! Wear a fanny pack and load it with snacks. Rather than having to take your big backpack on and off, just reach in to your little fanny pack, grab that bag of trail mix (Walmart’s peanut butter trail mix was my favorite on this hike!) and keep going.
Altitude affects people in a variety of ways. Despite having done many long backpack hikes including summiting Mt. Kilimanjaro in Africa, I was surprised with my loss of appetite. Both my daughter and I had to make ourselves eat. This is where I was so thankful for the many snacks we had packed.
SNACK FAVORITES: Justin nut butter packets, Cliff Shot Bloks, Lara bars, Trader Joe’s chocolate trail mix, dried bananas and apricots. We washed all this down with a NUUN at every major rest stop. In between, small sips through out water reservoir kept us hydrated and hiking.
Pass 2: Frigid Air Pass Trail Highlights
Taking about 30 minutes to chat with fellow hikers up top and dive into lunch, it was time to head to Frigid Air Pass. Looking up, clouds were just starting to gather, a tell tale sign that a Colorado summer rainstorm was approaching. *Start early to avoid getting caught in thunder/lightning storms on trail.
Steep switchbacks down down down West Maroon Pass is a doozy for your weighted back. In 3/4 mile we descended 800 feet, reaching the junction of Frigid Air Pass Trail. Follow the marked trail sign to Frigid Air Pass, heading right.
While your knees might feel terrible, your heart will be bursting taking in the renowned wildflowers Purity Basin is known for. NOTE! If you’re coming from Crested Butte, this is where you choose to head toward West Maroon or Frigid Air. (The trail to the left leads down to East Fork Valley to Schofield Park).


INSIDER TIP! Get out your water filter and fill up EVERY water reservoir you have. While many reports had said water sources were plentiful along Frigid Air Trail, we did not see anything but mud. Next fill up will be was about 1.5 miles down the other side of Frigid Air Pass.
Staring down the summit for Frigid Air Pass
This section of the trail is an incredible mix of mountain views, endless wildflower meadows and desert-like rocky terrain the final mile up summit.
The theme of the Four Pass Loop hike is “LOOK AROUND.”
On this section mountain views include Galena, Treasure, Baldy, and Cinnamon mountains to the west/southwest. The Ruby Range is off to the distance, easy to spot on a clear Colorado summer day.
You’ll come to a small “pond.” The day we were there, this pond was a dried up water hole. We had planned to replenish our water reservoirs at this spot - it didn’t happen. Fill up BEFORE you get to Frigid Air Trail.
Turn right (north) on the trail, passing the left side of the pond and climbing the very steep switchbacks. Expect to gain 365 feet in 0.3 miles.
Pass two done - Frigid Air Pass
Frigid Air Summit Views
Arriving at Frigid Air Pass, we were whipped! One of only three people up top, we sat down trying to catch our breath. Views from Frigid Air Summit include the Maroon Bells and Bellview Mtn. *We had hoped to sit and refuel but nature had another plan!
Black clouds began furiously forming in the sky. After a quick video break, we bolted down the other side of this mountain. Backpacks slapping against our backs, we raced down the steep switchbacks into Fravert Basin. The impressive rock cliffs protruded around the basin. Our goal was hit the spruce forest 1. 3 miles from Frigid Air Pass summit before the hail started.


We made it (barely) before torrential rain burst from the sky. The small flowing Crystal River was our saving grace for water. We had drained our reservoirs on the way up Frigid, parched by the time we got to the top.
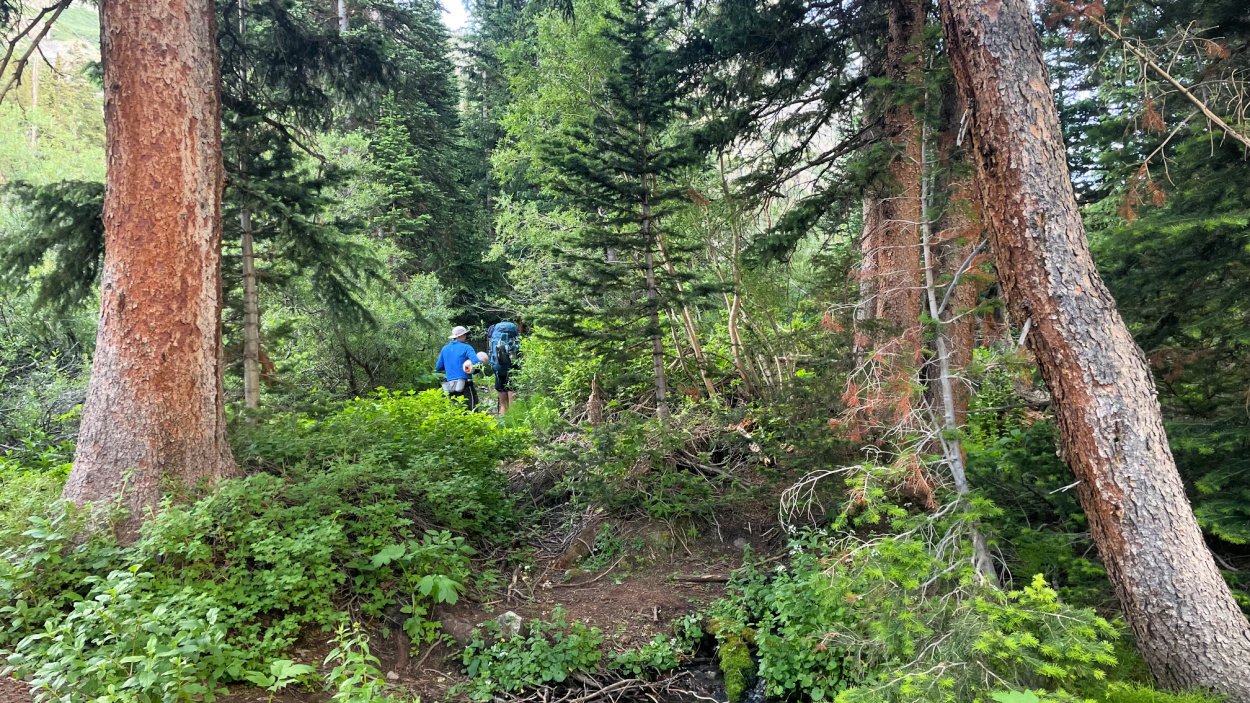
Now we had to find a campsite for the night. At 2.75 miles from Frigid Air Pass, we hit the woods and finally found some dispersed camping sites. A very steep descent with mud and rain made for a tricky traverse! Hoping to get a campsite right by the North Fork waterfalls, we trudged on, hail and rain coming down in buckets.
INSIDER TIP! Make sure all your backpacking gear is in a dry bag or large trash bag. Each of our backpacks had rain covers but they just couldn’t keep up with this Colorado storm.
In this deeply forested, muddy descent down hill, we met the nicest hiker who was coming up. Asking about trail conditions, he mentioned a secluded spot near a massive waterfall (North Fork Waterfall), perfect for our first night on Four Pass Loop. *This is a designated camping zone spot!


He was right! It was the best place to set up our tent (in the rain) and get into warm clothes. The temperatures had dropped quickly and we were wet.
INSIDER TIP! Nylon rope makes the perfect clothesline. We hung up everything - pants, socks, hats, gloves, putting our backpacks on tree knots to keep small critters away.
NOTE! The steady waterfall sound throughout the video is the immense waterfall behind our campsite. It was truly spectacular.
Setting up our camp kitchen, we headed down a little trail to the wide open river. Even with rain, we could not stop looking at the powerful waterfall over the ridge.
Dinner and hot chocolate at 5 pm. Bear can placed 300 yards from our tent and dry clothes on, we crashed in our tent. As the afternoon went on, about 5 hiking groups set up tent in this area. Both nights we were surrounded by people. The roar of the waterfall lulled us to sleep.
Day 2: Trail Rider Pass, camping at Snowmass Lake
QUICK LOOK
Length: Frigid Air to Trail Rider Pass ( 7.1 miles) Trail Rider Pass to Snowmass Lake (2.2 miles) Total Mileage: 9.3 miles
Time needed: 6 hours
Elevation: Frigid Pass to Trail Rider - +2,150’/-2,130’. Trail Rider to Snowmass Lake: -1,440’
Route: Campsite 3 miles from Frigid Air Pass to Trail Rider Pass. Overnight camp at Snowmass Lake
Pass 3: Trail Rider Pass Trail Highlights
Up at 5 am, we fired up the Jetboil and got some hot water started ASAP. The rain had stopped in the middle of the night, our Featherstone tent keeping us nice and dry. However, the clothing line we’d hung the night before still had soaking wet items on them.
INSIDER TIP! Bring a lighter or waterproof matches. We found our Jetboil had trouble self lighting on super cold mornings.

By 6 am we were back on this glorious Maroon Bells Aspen hike. Little did we know we’d find the mileage and elevation enormously challenging.
That said, Trail Rider Pass would be the best part of this epic Colorado hike.
Within the hour of starting today’s hike, we had another frigid water crossing. The sun was just peeking over the mountain range as we dipped our toes into that water.
Brrrrr…
On these large water crossings we chose to take off our hiking shoes and put on water shoes. We did see a fair amount of hikers just move on through, soaking shoes and socks.


Ready to warm up, we started briskly hiking through meadows and a few spruce trees on the path toward Lead King Basin.
Right around 1 mile from that first river crossing, a sign for Geneva Lake (to the left) and Trail Rider (to the right) appeared.
This is where the climb really begins.
Trekking poles were essential during this stretch, as did going slow and steady, one foot in front of the other.
Colorado wildflowers were on fire! We kept stopping to take in all the colorful hues. With such a steep hike, the beauty was a fantastic way to distract us.
Up Up Up we went, winding around, sometimes our feet perpendicular to the path.
IT WAS STEEP!
We felt this was the hardest part of the entire Four Pass Loop hike for us. Perhaps our legs were a bit tired from the previous day’s 12 miles, but we felt every rock and step up the entire summit.
We kept switchbacking up to the second junction toward Geneva Lake, gaining 1,130 feet in one mile.
WHEW!
We took a lot of “picture” breaks in this stretch, winded from the stiff elevation we were covering.
Views of Treasure Mountain and other peaks surround Lead King Basin. Bathed in morning light, the wildflowers bloomed! The extended views on this section of the hike were our absolute favorite.
The final climb gains 700 feet in 0.6 miles.
Pass 3 Done! Trail Rider Pass
SnowMass Lake Camping
Snowmass Lake was within sight, spurring us on to get there, set up camp and relax by the famous alpine lake. A group of college guys were chilling at Trail Rider’s summit, waiting on the rest of their group to make it. Their ambitious plan was Four Pass Loop in 2 days.
Having just come from Snowmass Lake, they warned us about the upcoming boulder field we’d need to traverse.
After that arduous climb up Trail Rider Pass, heading down -1,440’ felt like absolute freedom. As with every other pass thus far, we switchbacked our way down.
There was a fair amount of snow to navigate. A little slip and slide with a large backpack isn’t super fun but we managed to make it.
All was well until we hit the boulder field which appeared to be suspended over Snowmass Lake.
I am terrified of heights and spent a good 10 minutes trying to problem solve how to go.
At the end, we decided to keep our pack belts clipped and over the rocks we went. The video shows just how arduous this section is.
A few heart pounding moments later, we once again reached the good ‘ole dirt path heading left to Snowmass Lake.
The trail between the boulder field and the first campsite isn’t very far but feels so long. Initially we were confused which campsite we wanted to make home for the night. There are three camping areas to choose.


This is a great time to consult the printed Four Pass Loop campsite map you brought! We came to the well marked trail sign and headed left, down the hill toward Snowmass Lake. Arriving early afternoon, we had the pick of designated campsites.
INSIDER TIP! We were so disappointed with how much garbage we saw at Snowmass Lake. Bring an extra bag and carry out what you can. It is also more difficult to find a BIF (bathroom in forest) at Snowmass due to the many campsites and people. For both issues - garbage and BIF - please adhere to Leave No Trace principles.
*For more backpacking tips, check out the beginners guide to backpacking Colorado.
We picked THE BEST spot with views of Snowmass Mountain overlooking Snowmass Lake. Expect a lot of people in these designated camp areas. If you come in late afternoon, the pickings will be slim during high hiking times in the summer. The early bird sure does get the worm.
Arrival at 2 pm with bright sun allowed us to get out all our gear and dry it out. We were so tired from the early morning trek, our adrenaline worn out from the boulder field scramble, nothing felt better than to sit by Snowmass Lake, our feet soaking in the very cold alpine water.
Looking up, you see views of Hagerman and Snowmass Peaks rise along the ridge surrounding the lake. It felt like a fairy tale, the views almost fake with their immense diversity in color and size.
INSIDER TIP! There were so many bugs at Snowmass Lake. Adding a bottle of bug spray was THE BEST idea. Boy were we glad for it! These pesky flies swarmed until the sun went down.
We cooked dinner around 4 pm and found ourselves nestled in our comfy sleeping bags, ready for bed by 7:30 pm. I found a patch of flat (ish) land and a tree to do a yoga flow. It felt great to move and stretch after carrying that heavy pack all day. Legs up a tree is a great way to keep swelling at bay.
INSIDER TIP! Wear compression socks at night while sleeping. This helped so much with blood flow and fresh legs. I also chose to do some yoga poses at our campsite. Lying down and placing my legs up a tree trunk worked wonders for my swollen feet.
Nearby a camp of several older gentleman had brought a harmonica and ukulele. We were lulled to sleep by the sweet sounds of ballads sung.
This was our favorite day of the Four Pass Loop Hike. From the wildflower studded trail towards Trail Rider to the immense views from the summit, the pristine beauty of this pass felt indescribable. Snowmass Lake, for all its popularity, is still one of my favorite Colorado campsites to this day.
Tomorrow we’d head over our final pass, Buckskin Pass towards Maroon Bells. Until then, it was time to sleep well in this Colorado nature’s beauty!
INSIDER TIP! Keep water in your tent along with battery packs, water filter and electronics. We found ourselves super thirsty throughout the night, reaching for our nalgene more than once. When temperatures dip low, water filters can freeze up causing a major issue.
NEARBY HIKING OPTION!
How about this fabulous backpacking trip: Hike to Conundrum Hot Springs near Aspen, Colorado. Purely for outdoor enthusiasts who crave a backcountry retreat right in nature's lap, you’ll slip into soothing warm waters above 11,000 feet with panoramic views of majestic peaks.
Day 3: Buckskin Pass
At 4 am, I was up and ready to go. However, my hiking partner was not. Setting up my phone for a timelapse of the sun rising, I soaked in the majestic beauty of Snowmass Lake. Birds started announcing the morning while the sun quietly rose over Snowmass Mountain. Layered up sipping hot coffee, this is why we backpack Colorado trails.
Taking a moment to savor the majestic beauty of one of the top Colorado trails, I quietly murmured a word of thanks to nature.
Camp breakdown was quick. It’s amazing how fast you get a routine, especially when it’s chilly out! We were up and out of camp by 6 am, determined to hit Buckskin Pass by early morning.
INSIDER TIP! Leaving camp early each day insured we avoided most summer afternoon rainstorms. Another perk was having the trail to ourselves.


Pass 4: Buckskin Pass Trail Highlights
Take the path pointing in the direction of Maroon-Snowmass Trail, cross a small stream and come to a second junction. You’ll enter a beautiful pine forest, needles creating a soft landing for your tired feet. Look for the trail sign pointing right (southeast) toward Buckskin Pass.
We enjoyed morning sounds hiking through the forest and meadow, taking us up Lost Remuda Basin. The very fast moving (and deep) Snowmass Creek interrupts the trail. KEEP YOUR HIKING SHOES ON. To the right are two logs. Using our poles, we quickly moved across the water, heading back to the right up the trail.


About 1 1/2 miles from the junction at Snowmass Lake, switchbacking begins!
In just under a mile, we gained over 700 feet.
While a challenging climb, the wildflower dotted trail led us through a well shaded woods. Trickling water and small waterfalls appeared throughout the mile. Our minds were able to wander, enjoying the peaceful sounds of nature.
At the top of the ridge, the climbing stopped as we arrived in a large meadow. Buried in our own thoughts, we noticed a large pond below the trail. All of a sudden we spotted a moose and her baby, enjoying morning breakfast. Stopping for a second to take in the site, we quietly moved on. Moose have excellent hearing so stay quiet and start moving.
INSIDER TIP! There are a few beautiful campsites here next to a stream.
The final 1.2 miles covers 900 feet of elevation gain. This, in our opinion. was the easiest pass to summit coming from Snowmass Lake. Upon our arrival, we were the ONLY ONES at Buckskin Pass. What a gift to enjoy the views of this final Pass on our Four Pass Loop hike.
Pass 4 DONE - Buckskin Pass
Having arrived just around 8 am, we enjoyed an extended breakfast, watching the chipmunks and mountain goats scamper around. Views of Pyramid Peak to the east, West Snowmass and Hagerman Peaks, and Snowmass Mountain are impressive. Capital Peak, a class four 14er and Mount Daly are just as awesome.
Buckskin Pass to Maroon Bells Shuttle
While only 4.6 miles from Buckskin Pass to the trailhead, elevation loss is 2,882 feet.
Simply put, your knees and quads will take a pounding!
Heading downhill, much of it on a river rock and gravel trail was hard for our legs. Hiking poles were an absolute godsend on this final portion of our hike.
Our final pass descent began as a series of switchbacks through colorfully flowered meadows. So many peaks and ridges were in our line of sight - North Maroon Peak, the Sleeping Sexton and Pyramid Peak.
Willow Pass trail is to the left, a well marked sign. Stay right, continuing downhill.


Next up, Minnehaha Gulch. While the name might imply humor, there was not much laughing as we started down the VERY TEDIOUS rocky path. Good thing the spruce and aspen forest offered shade.
Just under 2 1/5 miles from the pass, we arrived at a junction to Crater Lake (1.7 miles from the trailhead). While we tossed around the idea of taking a detour to scout out this lake, ultimately we were ready to get home.
INSIDER TIP! Coming down Buckskin Pass is a doozy. Training on a stair climber or stadium steps WITH A HEAVY pack is great training for this portion.
My daughter had an ankle injury prior to our hike creating some knee issues counterbalancing. She was in extreme pain by the time we hit the trailhead. I, on the other hand, had spent A LOT of time on the stair master with a weighted pack and had no pain at all.
We kept going down this rockslide, looking around and taking pictures of the Maroon Bells and Sleeping Seton behind us. At the foot of the slide (about 1 mile from the Maroon Lake trailhead), we started seeing people on the wider path.


INSIDER TIP! While hiking rules stipulate uphill has right away, going downhill with a big pack over rocks was hard! We were not expecting ALL the people coming up from the Maroon Bells scenic area who were oblivious to any hiking protocol. While tired, stay to the right, smile and nod. Try not to be annoyed by the billows of perfume and lack of any hiking sense.
We got down to the Maroon Bells Shuttle just before 11 am, heading straight to the shuttle bus. Within 15 minutes, we boarded and sat down. The day visitors gave us a WIDE BERTH on the shuttle - we smelled ripe!
Changing buses at the RFTA station, we headed town, meeting my husband and youngest at an agreed upon bus stop.
Four Pass Loop Highlights
It is hard to describe the majestic beauty of this three day, two night hike Maroon Bells trip. Four Pass Loop backpacking can be done by beginners and experienced alike. All the preparation and time taken to navigate the Maroon Bells shuttle, which direction to hike Four Pass Loop trail and determining the best time to hike Maroon Bells was 100% worth it when we got on that trail!
The memories created with my eldest daughter, the extravagant mountain views and wildflower meadows will be etched in my brain forever.
While the hiking was HARD and painful at times, hiking Four Pass Loop is manageable with good physical training, preparation and hard work!
My daughter made a video of our hike. If you’d like to see and hear more about the actual hike we did, take a look!
This hike is also featured in our 17 Best Hikes in Colorado.
Below is a simple timeline to help you plan your Four Pass Loop HIke!
At a Glance To Do List *Hiking Four Pass Loop
January - Plan dates for Four Pass Loop Hike. Research route to take and campsite areas to overnight.
February - As EARLY as February 15, 8 am MST hop on recreation.gov and secure permits for:
Maroon Bells Day Parking - Maroon Bells Parking Reservation *If you plan on coming between hours 8 am/5pm
Overnight Backpacking Permit *$10/night
Early Summer -
Start collecting gear
Book lodging around Aspen (Basalt and Snowmass are good options for less expensive lodging)
Week Before Four Pass Loop Hike -
Organize gear
Purchase any last minute items (food, clothing)
Download and Print Four Pass Loop map, Four Pass Loop camping map, Directions to trailhead *Consider buying Maroon Bells Wilderness Map for future exploration.
Few Days Before Four Pass Loop Hike -
Pick up any rental gear
Pack and weigh backpack
Get in car and head to Aspen
Day Before Four Pass Loop Hike -
Enjoy an amazing meal. Take a hot shower. Sleep in a real bed
DAY 0 - LET’S START HIKING!
Melody’s Four Pass Loop clothing and toiletries
What to Wear Hiking Four Pass Loop
If this is your first time backpacking Maroon Bells Four Pass Loop, what to wear and what to bring can feel like a daunting task to figure out. We brought too much food and layers backpacking Maroon Bells after reading so many mixed reviews of weather and gear required vs. needed.
Layers were key for cold mornings and warm afternoons
Learn from our mistakes and download our FREE Ultimate Backpacking Checklist for Colorado hikes.
Along with 10 tips for backpacking Colorado, we categorized exactly what you need for this special Maroon Bells Colorado bucket list hike.
This Colorado Hiker’s Capsule wardrobe checklist takes most of the guesswork out of what to wear. Make sure to check the weather where you are hiking.
If you tend toward the cold side, throw in an extra base layer.
For an in-depth read on what to wear each season hiking Colorado trails, learn from our combined 40 years of hiking experience in every type of weather. Mother Nature can be relentless at altitude, even in the warmest months. All our lessons learned from the school of hard knocks and “oops, we forgot” moments are in one place so you don’t have to go through them!
We hiked Four Pass Loop July 10-12 and encountered rain, snow, ice and bugs as well as sun blistering hot days. Layers, as always, are key!

Our Backpack List *and what we’d leave at home next time
Toiletries:
contacts and glasses
toothbrush and toothpaste
NO deodorant. With the prospect of bear activity, I figured natural odors would be preferable to attracting a bear into our tent in the middle of the night.
Layers:
*Aside from my rain jacket, hat and gloves, everything was packed in a 5L dry bag. This was especially helpful on Day One when we got pelted by torrential rain and hail. Having dry clothes at camp kept us from a very cold night!
INSIDER TIP! A large trash compactor bag works great in a pinch. Put your gear, including sleeping bag, inside the bag in your backpack. Cinch and close up the pack, keeping your clothes (and sleeping gear) nice and dry.
4 pairs hiking underwear *Smartwool has some of my favorite hiking underwear. Easy to wash and dry with almost non existent seams, I wore those climbing Mt Kilimanjaro and have never looked back!
NOTE! I could have gotten away with bringing one pair. However, they are so lightweight and easy to pack, I was glad to have more options after the very wet and very sweaty hiking days we had.
5 pairs hiking socks *DarnTough is my favorite backpacking sock. I brought mid weight hiking ankle length socks and 1 calf length pair. Knowing we had multiple river crossings along with potential rain for the entire hike, I wanted to make sure to have extras to keep my feet dry and warm.
Insider Tip! Bring a pair of socks exclusively for sleep. Don’t wear them around the campsite and leave them in your sleeping bag. Relatively clean and dry night socks make a huge difference for warmth while sleeping.
Lightweight long sleeve shirt *The Lululemon Swiftly long sleeve shirt is a favorite of mine.
Wool vest *This Smartwool vest has been with me all over the world. Old as dirt, it was one of my favorite gear pieces I brought. I wore it with pants and shirt in the morning, keeping the core warm while we hiked uphill.
2 Pairs Cargo Pants *Kuhl’s zip cargos are great. Easy to convert into shorts, the fabric is water resistant for those freak but light Colorado rain storms.
Leggings *A clean freak, I like slipping on clean clothes at night. I only wore these leggings at night. NEXT TIME - SKIP bringing the second pair of cargo pants.
Wool light jacket *I ended up sharing this Smartwool jacket with my daughter who used it every night. Her sleeping bag got wet day one, making for a very chilly night.
Lightweight Puffer *The Patagonia puffer is always in my backpack NO MATTER THE SEASON. I kept it at the top of my backpack and constantly wore it on and off throughout the Four Pass Loop hike.
Rain Jacket *This is a must piece of gear. The Patagonia Torrentshell is reasonably price (around $170) for the pack it punches. We hiked over 3 hours in torrential rain on day one and I was dry as a bone that entire time.
Insider Tip! Wear a brimmed hat when it’s raining, pulling your hood up over it. Your face will stay dry with the rain dripping off the hat vs. the small little visor most rain jackets have.
Hiking boots and Gaiters *Love my Dirty Girl Gaiters
Buff *Short haired folks like me have some crazy hat head going on. The Buff worked great for wind and unkempt flyaways.
Lightweight wool gloves *These wool hiking gloves were a lifesaver during those chilly early mornings. I adore my Smartwool glove liners because they're not just easy to wear, but they also allowed me to cook, clean, pack, and break down camp without missing a beat.
Compression Socks *There are so many brands out there. My super old CEP calf length compression socks helped so much.
For a detailed list of EVERYTHING we brought on the Four Pass Loop Hike, download the ultimate backpacking checklist above.
Food
Dehydrated food packets averaged $15/meal. Easy to make (add water) *Mountain House Adventure has great meals.
Instant Oatmeal for breakfast *added scoop protein powder/each packet
Snacks *jerky, protein bars, trail mix, gummies, dried fruit, salt and vinegar almonds
Powdered drinks *instant coffee, hot chocolate mix, lemonade
NUUN and electrolytes *enough for a week
Nut butter
Flour Tortillas *fill with nut butter and tuna packets
INSIDER TIP! We brought way too much food. Plan on breakfast and dinner with snacks in between. Throughout the hike we constantly shared our food with others so we could have less weight in the bear can. *We didn’t have much of an appetite in the morning. I drank hot coffee and had a bar.
The Counter Assault bear keg would have been sufficient for our food needs. We rented the BV500 bear canister which took up so much room and weight.
other GEAR *for complete list, download Ultimate BAckpacking List for HIking Colorado
Backpack *50-80 liters
Sleeping bag
Water shoes *many river crossings throughout this hike in July
Biodegradable soap and hand towel
Water purifier *Water purification is essential
First Aid Kit
Knife
BIF bag (bathroom in forest) *shovel, tp, hand sanitizer, bag for waste products OR WAG bags
Stove and fuel
Camp cup and spork
Flares and nylon rope *used rope every night for clothesline to dry wet layers
This Beginners Guide to Backpacking has 10 tips for making Four Pass Loop memorable along with the FREE downloadable Ultimate Backpacking Checklist. If you’re curious what type of sleeping bag you should bring to stay just right (not too hot or too cold) AND keep your backpack weight down, check out these 5 features to look for in a sleeping bag.

Gear Rentals
If you’re near a REI, consider renting backpack, poles, sleeping pad and bear cans. As a member you get a 25% discount.
Nearby Gear Rentals/Outdoor Gear Stores
For gear rentals around Aspen and places to purchase those last minute “Oops, I forgot” items, there are many options.
Aspen Gear Rentals *No reservations required. First come/First Served
Mountain goats chilling on Buckskin Pass
Miscellaneous Trail Information
Four Pass Loop Trail: Hazards
Water Crossings: Large snowdrifts and spring snowmelt create fast paced water crossings. Bring and wear water shoes for crossings. Make sure to unclip waist and chest belts when crossing. Look for shallow areas with least flow of water.
Wildlife: While you are required to bring a bear proof canister for food, you’re more likely to see mountain goats, porcupines, squirrels, and birds. NOTE! Keep anything that smells out of your tent. Prepare food at least 200 feet away from tent/sleeping area.
Weather: Altitude hiking takes you above tree line. On Four Pass Loop, expect summer thunderstorms and lightning. Check the weather right before your trip. Know Colorado sky signs. Fast accumulating white clouds indicate approaching storms. Storm warning signs also include abrupt drops in temperatures. July/August are known for heavy rainfall in Colorado mountain areas.
For current weather checks specific to Four Pass Loop, use View Weather. Put in the pass name.
Snow: Snowstorms in the Maroon Bells Colorado area come as late as early June. In the fall, expect weather to change as early as mid-August.
Acute Mountain Sickness (altitude sickness): If homebase is near sea level for you, read up on altitude sickness signs. Hydrate a few days prior to your trip. Alternate water and electrolytes throughout your hike. Take small sips water throughout the day (hydration reservoirs work great for this).
Emergency Information
Search and Rescue - Backpacking Maroon Bells wilderness area is relatively safe and well marked. Volunteer Search and Rescue (SAR) professionals are on alert to help out in the backcountry. Purchasing a CORSAR card ($3 for 1 year card, $12 for a 5 year) to help ensure this type of support continues in Colorado.
Emergency room (Aspen Valley Hospital - 401 Castle Creek Road)

